
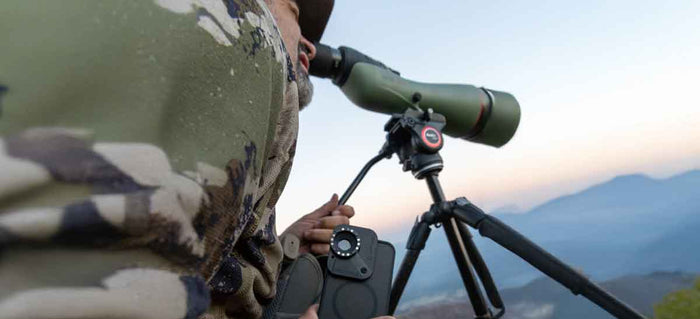
Capturing crisp, detailed images through a spotting scope has never been easier thanks to modern phone mounting solutions. Whether documenting wildlife, surveying landscapes, or sharing astronomical views, a reliable phone mount transforms a traditional optic into a powerful digiscoping tool. This guide walks through the essential steps for setting up a spotting scope phone mount, highlights key considerations for clear imaging, and offers practical tips to maximize performance without the need for extensive technical knowledge.
Why Use a Phone Mount with a Spotting Scope?
Integrating a smartphone with a spotting scope provides several advantages that go beyond simply viewing through the eyepiece:
- Instant sharing: Capture and upload photos or videos directly from the field.
- Digital zoom flexibility: Combine optical magnification with the phone’s digital capabilities.
- Enhanced stability: A well-designed mount reduces hand shake, delivering sharper images.
- Versatile recording: Record time-lapse sequences, video, or stills without additional equipment.
Choosing the Right Adapter
Selecting a compatible adapter is the first critical decision. Several options are available, each tailored to different phone models and scopes. When evaluating a spotting scope phone adapter, consider the following factors:
Compatibility
- Phone size and camera placement – ensure the adapter accommodates the lens without obstruction.
- Scope eyepiece diameter – most adapters feature adjustable clamps for 1.25″ or 2″ tubes.
Build Quality
- Materials such as aluminum or reinforced plastic provide durability.
- Secure locking mechanisms prevent slippage during movement.
Ease of Use
- Quick-release designs allow fast attachment and removal.
- Magnetic options, like the Magnetic Digiscoping Adapter, simplify alignment.
Step-by-Step Setup Guide
Follow these steps to achieve a stable, clear connection between your spotting scope and smartphone:
- Prepare the equipment. Clean both the eyepiece and phone camera lens with a microfiber cloth to remove dust or fingerprints.
- Attach the adapter. Slide the digiscoping adapter onto the scope’s eyepiece, tightening the clamp until it feels snug but not over-tightened.
- Mount the phone. Position the smartphone in the adapter’s cradle, aligning the camera lens with the center of the eyepiece. Use a phone adapter for spotting scope that offers adjustable brackets for fine-tuning.
- Secure the connection. Engage any locking levers or magnetic catches. Double-check that the phone does not wobble when gently nudged.
- Adjust focus. Look through the eyepiece and use the scope’s focus knob to bring the image into sharp view on the phone screen.
- Fine-tune alignment. Slightly shift the phone left or right until the entire field of view is captured without vignetting.
- Test shot. Take a quick photo or video to verify exposure and focus. Adjust ISO, shutter speed, or HDR settings on the phone as needed.
Optimizing Image Quality
Even with a perfect mechanical fit, achieving crystal-clear images requires attention to several photographic parameters:
- Stability: Use a tripod or a stable surface for the scope. A remote shutter or timer reduces camera shake.
- Lighting: Early morning or late afternoon light often yields the best contrast. Avoid direct glare on the eyepiece.
- Camera settings: Set the phone to manual mode if available. Lower ISO (100-200) minimizes noise, while a moderate shutter speed (1/250-1/500 s) balances motion blur.
- Zoom management: Rely primarily on the scope’s optical power; excessive digital zoom on the phone degrades detail.
Common Troubleshooting Issues
Encountering problems is normal, especially when first integrating a phone with a spotting scope. Below are typical challenges and quick fixes:
Vignetting or Dark Corners
- Re-center the phone so the camera lens aligns perfectly with the eyepiece.
- Check that the adapter’s aperture is fully open and not partially obstructed.
Image Blur
- Confirm the scope is fully focused before capturing.
- Increase the tripod’s stability or add a weight to the base.
- Enable the phone’s image stabilization feature if available.
Phone Overheating
- Limit continuous video recording; take short bursts instead.
- Give the device brief cooling periods between sessions.
Advanced Applications
Beyond basic photography, the combination of a spotting scope and a smartphone opens doors to specialized techniques:
- digiscoping with iPhone – Leverage Apple’s advanced computational photography for enhanced low-light performance.
- iphone digiscoping – Use dedicated apps that overlay reticles or capture RAW files for post-processing.
- digiscoping with smartphone – Android users can benefit from manual exposure controls and third-party lens apps.
- Time-lapse wildlife monitoring – Set the phone to interval shooting and let the scope track a stationary subject.
- Astronomical imaging – Pair the scope with a high-resolution phone to record planetary details or lunar surface textures.
Choosing the Best Digiscoping Adapter
When searching for the best digiscoping adapter, prioritize features that align with your shooting style:
- Universal fit for multiple phone models.
- Quick-release mechanism for rapid field changes.
- Robust construction that withstands temperature fluctuations.
- Integrated rubber padding to protect both the phone and eyepiece.
Conclusion
Integrating a smartphone with a spotting scope using a reliable Digiscoping Phone Adapter transforms a classic optical instrument into a modern imaging powerhouse. By selecting the appropriate adapter, following a systematic setup process, and fine-tuning photographic settings, clear, share-ready images become achievable in minutes. Whether pursuing birdwatching, field research, or casual nature photography, the techniques outlined here provide a solid foundation for consistent, high-quality results.